
Compute
The Fastly Compute platform is an advanced edge computing system that runs your code, in your favorite language, on our global edge network. Security and portability are provided by compiling your code to WebAssembly. We run your code using Wasmtime.
With the Compute platform you have access to Fastly edge primitives like data stores, dynamic configuration, and real-time messaging. The platform is completely language agnostic at every layer of the stack, and you can include dependencies from your preferred package registry.
Whether it's authentication, personalization, geofencing, SEO, observability, templating, APIs, or even your entire application, whatever you can conceive, you can probably run on the Compute platform.
Getting started
To use the Compute platform, you must create a Fastly account if you don't already have one.
Generate an API token
To authenticate the Fastly CLI, create an API token for your account. Make sure the token has a global scope, and make a note of the token.
Install the Fastly CLI
The Fastly CLI is available for multiple operating systems.
- MacOS
- Windows
- Linux
Type brew install fastly/tap/fastly to install from Homebrew.
Verify everything works by running fastly version. For example:
$ fastly versionFastly CLI version vX.Y.Z (abc0001)Built with go version go1.20.1 linux/amd64Configure the CLI to act on your behalf using the API token you created:
$ fastly profile createThis will store your API token credential in a configuration file and remember it for subsequent commands. There are other ways of authenticating the CLI if you prefer.
Choose a language to use
We provide SDKs for multiple languages that can compile to Compute-compatible WebAssembly packages. Here is a comparison of SDK-exposed features that can differ among languages:
HINT: This table only covers features exposed to your code. You may also be interested in how the Compute platform compares to VCL.
| Current SDK version | 0.10.0 | 3.13.1 | 1.3.0 | |
|---|---|---|---|---|
| Equally supported | Geolocation, Auto decompression, Dynamic compression, Environment variables, Cache override, Real time logging, KV stores, Config stores, Secret stores, Fanout, Dynamic backends, Simple cache, Readthough cache | |||
| Core feature differences | ||||
| WebSockets passthrough ℹ️ | ✅ | - | - | |
| Mutual TLS for origin fetch | ✅ | - | - | |
| Core cache interface ℹ️ | ✅ | ✅ | ✅ | |
| Pre-release feature differences | ||||
| Purging see note below | ✅ | - | - | |
| Backend health | ✅ | ✅ | - | |
| Device Detection | ✅ | - | ✅ | |
| Edge rate limiting ℹ️ | ✅ | ✅ | ✅ | |
| More about Rust » | More about JavaScript » | More about Go » | ||
- Purging from edge code allows purge operations to be triggered when processing edge requests. Purging via our API is available regardless of which SDK is used.
We recommend the use of official Fastly SDKs (available for Rust, JavaScript, and Go), but you can also create your own for a language of your choice, or use a community-created SDK. Learn more about custom SDKs.
Install language tooling
To build your project, the Fastly CLI requires your local toolchain to be available and up to date. To install the toolchain for your chosen language, follow these instructions:
- Rust
- JavaScript
- Go
Compiling Rust applications for the Compute platform requires that you have rustup installed, along with Rust's stable channel and the wasm32-wasi toolchain. Install Rust and its dependencies using rustup so you can begin building Compute services:
If you don't have rustup installed:
Download and install rustup and the Rust stable toolchain:
$ curl --proto '=https' --tlsv1.2 -sSf https://sh.rustup.rs | sh -s -- -y --default-toolchain stable Install the wasm32-wasi target for the stable toolchain:
$ rustup target add wasm32-wasi --toolchain stableIf you do have rustup installed:
Install Rust:
$ rustup toolchain add stable Install the wasm32-wasi target for the stable toolchain:
$ rustup target add wasm32-wasi --toolchain stableCreate a new project
Type fastly compute init to scaffold a new Fastly Compute project. The CLI will generate source code for your project in the current working directory.
You will be asked to choose a language and then a starter kit to use as the starting point for your project. There are many starter kits available. If this is your first project, we recommend choosing the default starter for your chosen language.
$ mkdir example && cd example$ fastly compute initFollow the prompts to configure your new project:
Creating a new Fastly Compute project.
Press ^C at any time to quit.
✓ Validating directory permissions
Name: [example]Description: My new Rust-based app!Author (email): jo.test@example.comLanguage:[1] Rust[2] JavaScript[3] Go[5] Other ('bring your own' Wasm binary)Choose option: [1] 1Starter kit:[1] Default starter for Rust    A basic starter kit that demonstrates routing, simple synthetic responses and    overriding caching rules.    https://github.com/fastly/compute-starter-kit-rust-default[2] Empty starter for Rust    An empty starter kit project template.    https://github.com/fastly/compute-starter-kit-rust-empty...
Choose option or paste git URL: [1]
At the prompts, provide details about the service you're creating:
- Name: Enter a name for your service. By default, the CLI uses the name of the current directory.
- Description: Optionally enter a short description for your service, or leave it blank.
- Author: Enter an email address or accept the default, which is the email associated with your API token.
- Language: Select the language you want to use to write your code.
- Starter kit: Choose from the available starter kits or press enter to accept the default. You can also enter the URL of a GitHub repo to use a compatible template that's not in the list of starter kits.
A local development environment and a fastly.toml package manifest will be generated based on your selections:
✓ Fetching package template✓ Reading package manifest✓ Setting package name in manifest to "example"✓ Setting description in manifest✓ Setting authors in manifest to 'jo.example@example.com'✓ Setting language in manifest to 'rust'✓ Saving manifest changes✓ Initializing package
Initialized package example to:    /home/jo/repos/example
To publish the package (build and deploy), run:    fastly compute publish
SUCCESS: Initialized package example
HINT: See the fastly compute init command's reference page for full options (e.g., if you want to use a directory other than the current one).
Compile to WebAssembly
You already have a complete, functional Compute project at this point. A default starter kit will run fine without any code changes, but if you want to dive in to the code right now, check out the language-specific guides on Rust, JavaScript or Go.
To run the Compute project on Fastly, it needs to be compiled into a WebAssembly module that can be packaged for Fastly use. The CLI runs the appropriate compiler for the language you're using by executing the scripts.build command defined in your project's fastly.toml file, and generates the necessary WebAssembly binary.
IMPORTANT: The default fastly.toml build command for JavaScript assumes dependencies are already installed. To make sure this is done, run the dependency manager of your choice to install the dependencies listed in package.json. For example, npm or yarn:
$ npm installThe compilers for Rust and Go automatically resolve and install dependencies, so those will usually be taken care of when you run fastly compute build.
Type fastly compute build when you're ready to build:
$ fastly compute build✓ Verifying package manifest✓ Identifying package name✓ Identifying toolchain✓ Running [scripts.build]✓ Creating package archive
SUCCESS: Built package (pkg/<name>.tar.gz)
Deploy to a Fastly service
To deploy the project to Fastly, run fastly compute deploy.
IMPORTANT: Deploying your first Compute project will start a Compute free trial. While on a free trial, Compute services in your account are subject to lower limits and cannot be used for production traffic. When you're ready to use your Compute service for production traffic, contact our sales team or your Fastly account contact.
If you already have a Fastly service you want to deploy the package to you can add the service ID into the service_id property in fastly.toml before running the deploy command; otherwise the CLI will lead you through creation of a service automatically.
$ fastly compute deploy
There is no Fastly service associated with this package. To connect to an existing serviceadd the Service ID to the fastly.toml file, otherwise follow the prompts to create aservice now.
Create new service: [y/N] y
Service name: [example]
✓ Creating service
Domain: [random-funky-words.edgecompute.app]
Backend (hostname or IP address, or leave blank to stop adding backends):
✓ Creating domain 'random-funky-words.edgecompute.app'✓ Uploading package✓ Activating service (version 1)✓ Checking service availability (status: 200)
Manage this service at:    https://manage.fastly.com/configure/services/PS1Z4isxPaoZGVKVdv0eY
View this service at:    https://random-funky-words.edgecompute.app

SUCCESS: Deployed package (service PS1Z4isxPaoZGVKVdv0eY, version 1)
At the prompts, provide details about the service you're creating:
- Domains: Press enter to accept the automatically generated domain name. We'll take care of the TLS and DNS and give you a working domain immediately. It's a good idea to accept the default now and add more domains to the service later.
- Backends: If you want to configure an origin server for your service, enter a valid hostname, or an IPv4 or IPv6 address. Alternatively, leave the prompt blank to create a service with no origin server. Such services cannot forward requests to your servers, but they can respond to client requests with a response composed within your Compute package.
The output includes a link to manage your service in the Fastly web interface. You can use this link to perform more complex configuration of the service, such as adding or removing domains, changing origin server settings, and setting up logging endpoints.
HINT: Once you've done a few deploys, you might want to start using orchestration tools like Terraform to manage your Fastly service configurations.
After the command completes, it may take up to a minute before the new service begins handling requests, and if you're replacing a previous version of the package, the earlier version may continue to handle requests for that period.
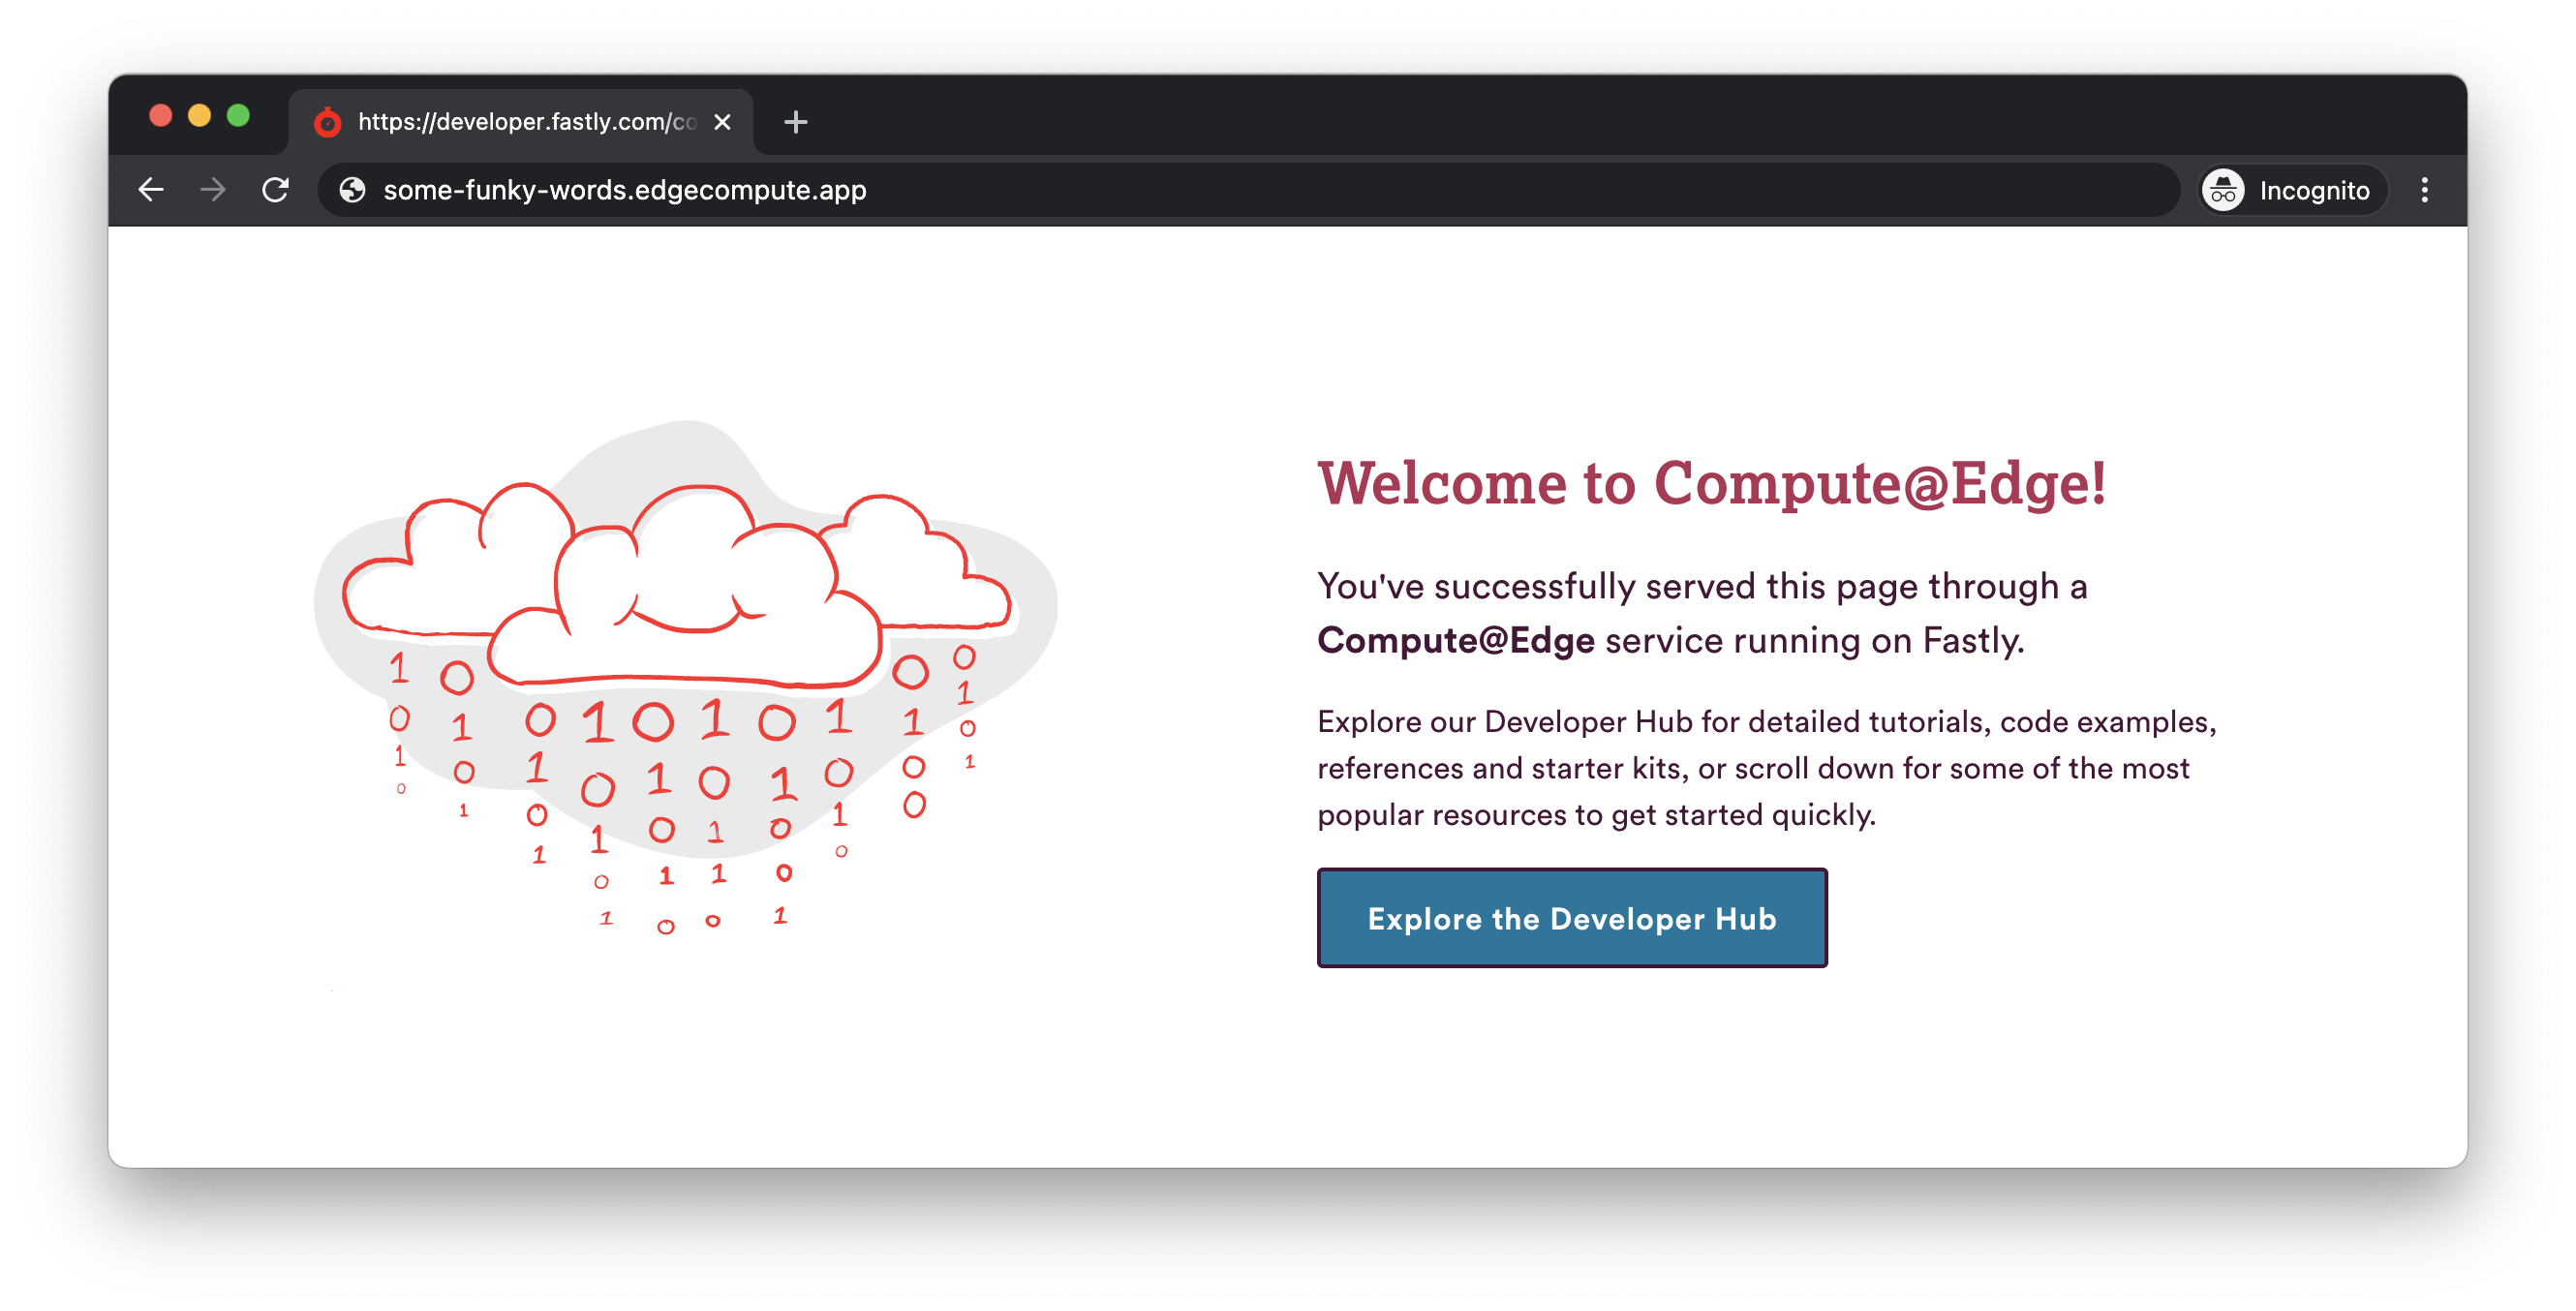
Test and celebrate
Open a browser and head over to the domain that was assigned to the service, such as random-funky-words.edgecompute.app, and you should see a working site. If you used the default starter kit, it will look something like this:
Add your own domain
Now that your working project is deployed, you may want to assign a domain name to it. We have a lot of TLS options. As a starting point, it's a good idea to create a TLS Subscription so that Fastly will generate a certificate for you.
Go further
If you would like to learn more about how the Compute platform integrates with your preferred language, read our getting started guides for each of our officially supported languages:
If you are already familiar with VCL and want to migrate an existing VCL service to the Compute platform, try the VCL to Compute migration guide, which shows examples of the most common use cases in VCL and how to implement the same functionality using the Compute platform's supported languages.
Or maybe you have an idea in mind and want to experiment with examples? Try cloning a starter kit, copy and pasting code from our code examples, or following a tutorial.
Limitations and constraints
Compute services accept client connections on port 443 only. This is different from VCL services, which support client connections on port 80.
HINT: If your Compute service receives a request on port 80, Fastly automatically returns a 308 ("Permanent Redirect") response status with the Location header indicating the HTTPS version of the same URL in a Location header.
The following default limits apply to Compute services. Entries marked can be adjusted in code using the limits interface in your preferred SDK (e.g., the limits module in the Rust SDK). If you need to exceed any other limits, please speak to your Fastly contact or contact Fastly support:
| Item | Limit | Scope |
|---|---|---|
| Maximum compiled package size | 100MB | per service |
| Maximum cached object size | 100MB | per object |
| Maximum CPU time available to a single request instance | 50ms | per execution |
| Maximum runtime for a single request instance | 2 min (60s for free trials) | per execution |
| Maximum memory consumption | 1M bytes stack, 128MB heap | per execution |
| Maximum number of dictionary lookups | 16 | per execution |
| Maximum number of backend requests | 32 (10 for free trials) | per execution |
| Maximum length of a header name | 8192 bytes | per header |
| Maximum length of a header value | 8192 bytes | per header |
| Maximum length of a method name | 8192 bytes | per request |
| Maximum length of a URL | 8192 bytes | per request |
An 'execution' refers to a single instance of a Compute program being executed, normally in response to a client HTTP request. Separate limits also apply to the use of log tailing with Compute services.
IMPORTANT: Compute services are also affected by limits that apply to products or platform services that you access through your application code. Refer to their own documentation for information on how those limits might interact with your application:
